15 Beautiful Christmas Crafts for Adults for Home Decor
Handmade decor has a quiet kind of luxury. These Christmas crafts for adults turn candles, branches, fabric, and clay into elegant pieces that make your home feel styled, warm, and personal.
This article shares 15 beginner-friendly projects, from a velvet ribbon wreath and marbled clay ornaments to a candle tray and a mini branch tree. Each idea solves a real problem: bare shelves, a tight budget, or decor that feels too childish or too store-bought. I’ve noticed that grown-up crafts work best in a calm palette with natural textures. In my experience, two or three projects are enough to shift the mood of a whole room. Scroll through, save your favorites, and start with the idea that suits your style.
Velvet Ribbon Wreath

- Adds rich color and soft texture to a door or wall
- Uses ribbon, a wire ring, and a few stems
- Catches lamp light better than plain fabric
- Makes a lovely handmade gift
A wreath can look like boutique decor when the ribbon does the talking. Wrap a wire ring with deep green or burgundy velvet ribbon, overlapping each turn so no gap shows. I’ve noticed that velvet catches lamp light in a way plain fabric never does. Add a simple bow and a few dried stems, and the finished piece feels rich and calm. It hangs well on a front door, a mirror, or an interior wall. The whole project takes about an hour, and the materials cost less than a single store-bought wreath, which makes it perfect for gifting too.
Ribbon choice and technique decide how polished it looks. Use wired velvet ribbon about five centimeters wide, since it holds its shape better than soft ribbon. Start at the back of the ring, secure the end with a dab of hot glue, and wrap at a slight angle. Pin or glue every few turns to stop slipping. Tuck in dried eucalyptus, berries, or a small sprig of pine for texture. Make a loose bow with long tails instead of a tight one. The finished wreath looks elegant, plush, and welcoming, and it brings quiet luxury to any entry.
Marbled Clay Ornaments

- Looks like handmade porcelain with simple clay
- Every piece has a one-of-a-kind swirl
- Gold edges add a quiet shine
- Doubles as a gift topper
Marbled clay looks like handmade porcelain, and it is far easier than it sounds. Twist white and grey clay together, roll it flat, and cut out stars, circles, or arches with cookie cutters. I’ve tried this on a quiet weekend, and the swirls came out different every time, which is the charm. Brush the edges with gold paint once dry. Thread a ribbon through each hole and hang them on the tree, a branch, or a gift. The soft stone look suits modern and traditional homes alike, and a small batch costs only a few dollars.
Technique keeps the marbling elegant. Use only two or three clay colors, and twist them just a few times, because over-mixing turns everything muddy. Roll the clay about five millimeters thick and press cutters straight down. Poke the hole with a straw before drying. Let each piece dry flat for twenty-four hours, flipping once to prevent curling. Sand rough edges gently, then seal with a matte varnish for durability. Clay ornaments are decorative, so keep them away from pets and small children. The finished set looks refined, tactile, and timeless, and it makes a thoughtful handmade gift for a host.
Also view: 17 Thanksgiving Crafts for Adults to Make This Holiday
Candle Greenery Tray

- Turns loose decor into one styled centerpiece
- Fresh greenery adds a gentle pine scent
- Ivory candles keep the look calm and classic
- Assembles in about ten minutes
A tray can turn loose decor into a centerpiece. Place three ivory candles of different heights in the middle, then tuck cedar, pinecones, and dried orange slices around the base. I’ve seen this arrangement make an ordinary dining table look styled in ten minutes. Odd numbers feel natural, so keep the candle count at three or five. The warm glow softens the whole room at dinner, and the scent of fresh greenery adds a quiet holiday mood. It works on a coffee table, a console, or a kitchen island, and you can refresh it weekly.
Safety comes first when flame meets greenery. Use flameless LED candles, or keep real wicks well clear of dry needles and never leave them unattended. Choose a heat-safe tray with a lip, and set it on a stable surface away from curtains. Cut greenery into short sprigs, and tuck stems into tiny water vials so they stay fresh for days. Vary candle heights by at least five centimeters for rhythm. Add a linen runner underneath to soften the look. The finished tray looks fragrant, elegant, and effortless, and it makes every evening meal feel like an occasion.
Branch Mini Tree
- Gives a sculptural tree shape with free branches
- Fits narrow consoles and small rooms
- Lightweight ornaments keep the look airy
- Stays pretty as winter decor after the holidays
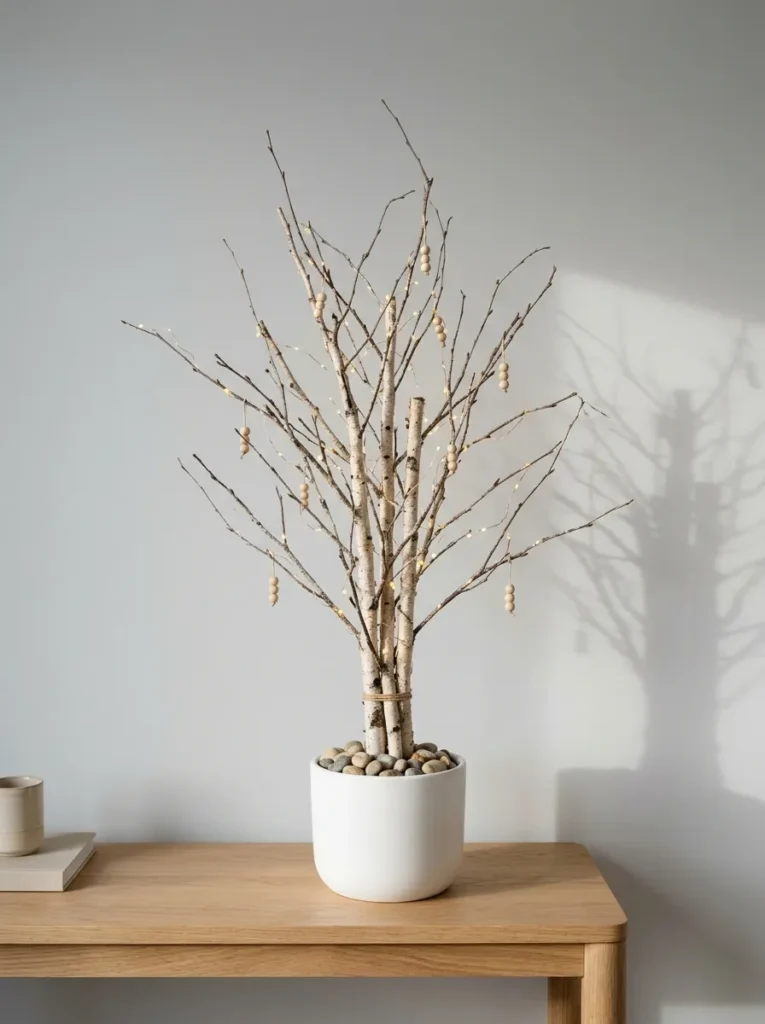
A tree does not need needles to feel festive. Bundle bare birch or willow branches in a heavy pot, fill it with pebbles, and trim the tallest stem to the center. I’ve noticed that open branches look sculptural, almost like winter art. Hang tiny wooden beads, paper stars, or small glass ornaments from the tips. Wrap a thin string of warm lights through the stems for an evening glow. The airy shape suits small rooms and narrow consoles, where a full tree would crowd the space. It costs almost nothing, since the branches are free.
Preparation keeps the branches tidy. Cut them in different lengths, with the tallest about sixty centimeters, and let them dry indoors for a few days so bark stops shedding. Brush the tips lightly with white paint for a frosted effect if you like. Choose a pot with a heavy base, because tall branches tip easily. Hang only lightweight pieces, since thin tips bend under heavy ornaments. Use cool-running LED lights, as dry twigs burn easily. The finished tree looks calm, modern, and handmade, and it stays pretty well past the holidays as winter decor.
Embroidery Hoop Ornaments
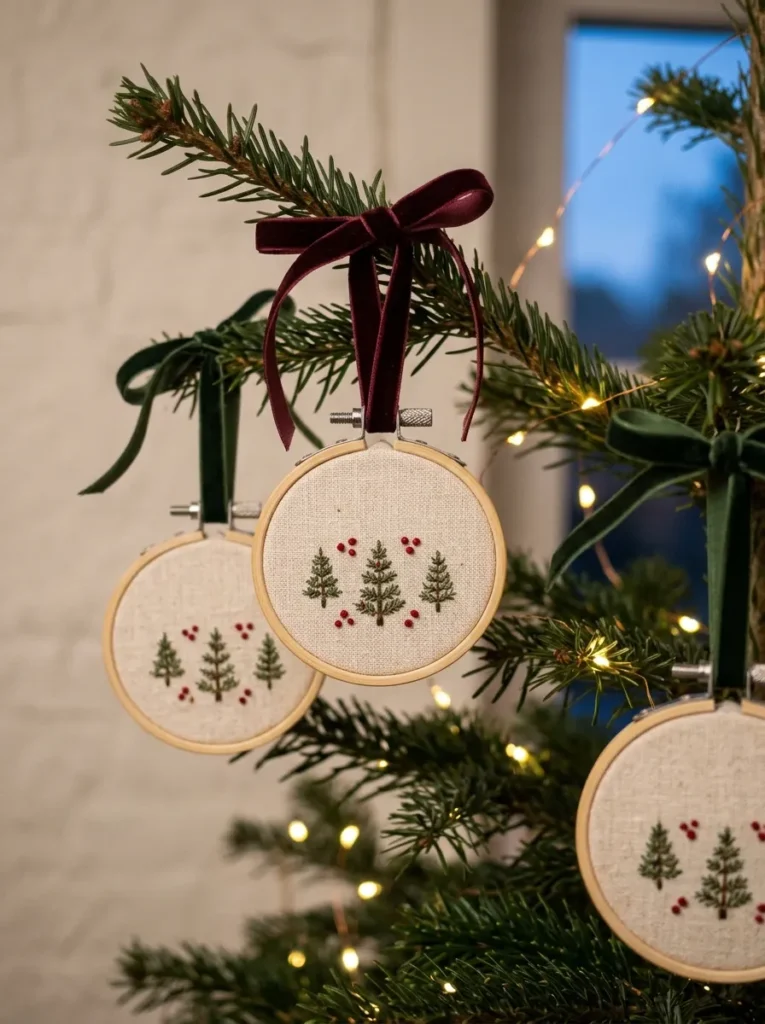
- Turns simple stitches into tiny pieces of art
- Beginner backstitch is all you need
- Each ornament feels personal and handmade
- A set of six makes a lovely gift
Stitching is a calm way to spend a winter evening. Stretch cream linen in a small wooden hoop, sketch a pine tree or a sprig of holly, and fill it in with simple backstitch. I’ve tried this as a beginner, and a basic design still looked charming. Trim the extra fabric, glue it to a felt circle, and add a ribbon loop for hanging. Each ornament feels personal, like a tiny piece of art. Hang them on the tree, a mirror, or a doorknob. A set of six makes a lovely handmade gift.
Simple choices make stitching easier. Use a washable pen to draw the design, and keep it small, about five centimeters wide, so it finishes in an hour. Three strands of thread give clean, bold lines, while two work better for fine details. Pull each stitch gently, because tight thread puckers the fabric. Choose red, forest green, and cream thread for a classic palette. Finish the back so it looks as good as the front. The completed ornaments look delicate, warm, and thoughtful, and they bring a quiet, handmade charm to any tree.
Dried Citrus Garland

- Slices glow like stained glass in daylight
- Adds a fresh citrus and cinnamon scent
- Costs only a few pieces of fruit and twine
- Looks lovely on mantels, shelves, and window frames
Some decor glows like stained glass. Slice oranges thin, dry them slowly, and thread them with cinnamon sticks and bay leaves on natural twine. I’ve noticed that the scent greets guests before they even notice the garland. The amber slices look stunning against white walls and green boughs. Drape the strand across a mantel, a shelf, or a window frame. Mix in a few dried lemon or grapefruit slices for color variety. The project costs only a few pieces of fruit, and the kitchen smells wonderful while the slices dry in the oven.
Slow drying protects the color. Cut slices about six millimeters thick and blot them with a towel. Bake at roughly 95 degrees Celsius for two to three hours, flipping every hour, then cool them fully so they crisp. Pierce each slice with a large needle and thread it onto twine, spacing them evenly. Keep the garland in a dry room, because humidity softens dried fruit. Skip this idea if anyone at home has a citrus allergy. Store it flat in a box after the season. The finished garland looks earthy, bright, and nostalgic, and it adds a gentle seasonal warmth.
Macrame Tree Hanging

- Adds soft texture to a plain wall
- Uses no floor space at all
- Cream cord blends with almost any room
- Fairy lights behind it create an evening glow
Texture makes a wall feel warm. A macrame tree uses cotton cord knotted into a triangle, then trimmed into soft fringe. Hang it from a wooden dowel above a sofa or bed, and it becomes a calm focal point. I’ve tried a beginner version, and it took one relaxed evening with a podcast. Add a few wooden beads or a tiny star at the top. The cream color blends into almost any room, while the fringe catches the light. It gives you a tree-like feature without using any floor space.
Thick cord makes the work easier. Four-millimeter cotton rope holds its shape and hides small mistakes. Cut strands generously, because knots use more length than you expect. Work in rows of square knots, shortening each row to form the triangle. Comb the fringe gently for a soft, feathered edge, then trim it into a clean point. Tuck warm fairy lights behind the cord for a gentle glow at night. Keep the piece away from candles, since cotton burns easily. The finished hanging looks handmade, calm, and cozy, and it can stay up through winter as a softer wall decoration.
Pillar Candle Wraps
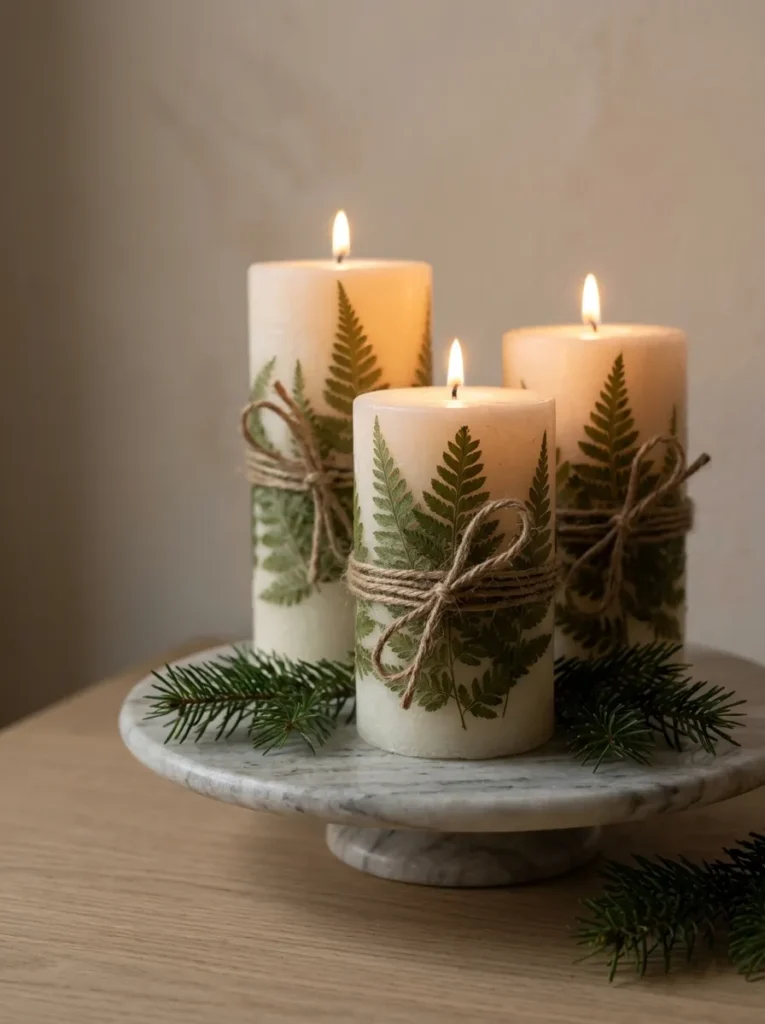
- Makes a plain candle look custom
- Pressed fern adds delicate natural texture
- Costs only a few dollars per candle
- Wraps up beautifully as a hostess gift
A plain candle can look custom in minutes. Wrap a pillar candle with a strip of dried fern, eucalyptus, or lace, and tie it with twine or velvet ribbon. I’ve seen this simple trick make a basic store candle feel like a boutique piece. Group three wrapped candles of different heights on a tray or cake stand. The natural texture pairs beautifully with ivory wax and warm light. It costs only a few dollars, and each candle can match your color palette. These also make elegant hostess gifts, wrapped in tissue paper.
Safety shapes the design. Keep the wrap well below the flame, and stop it at least five centimeters from the top edge so nothing can catch. Use a tiny dot of glue or a rubber band hidden under the ribbon to hold the material. Better yet, choose flameless candles if the wrap is paper or lace. Never leave a lit candle unattended. Press fern between book pages for a week before using it, so it lies flat. Choose a short strip, because tall wraps look heavy. The finished candles look soft, natural, and polished, and they glow on a mantel.
Paper Star Lanterns
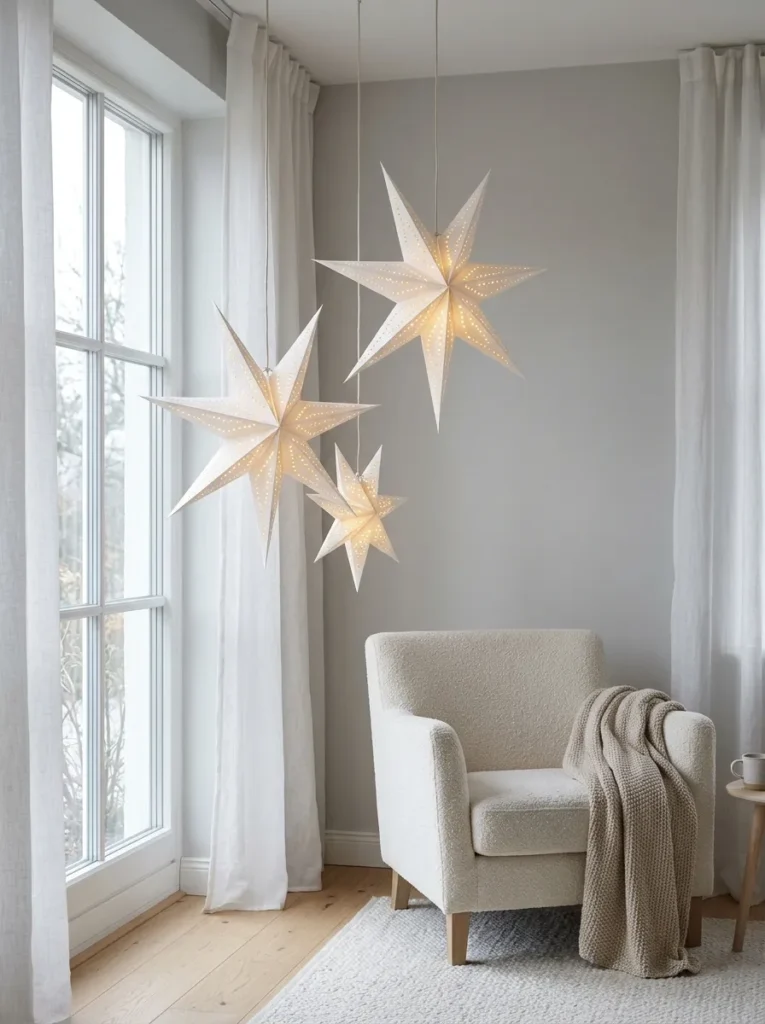
- Casts delicate star-shaped shadows on the wall
- Costs only paper, glue, and a small LED light
- Looks best in groups of three
- Brightens windows, stairs, and dining areas
Paper can glow like fine glass. Fold or cut a white paper star lantern, hang it over a string of warm lights, and the whole corner softens. I’ve noticed that paper stars look elegant in groups of three at different heights. Choose cream, white, or kraft for a calm palette. Hang them near a window, above a dining table, or beside a staircase. The light shines through the cutouts and casts delicate shadows on the wall. A set takes an afternoon, and the materials cost only a few dollars, which keeps this idea easy.
Heavy paper keeps its shape. Use cardstock or watercolor paper, since thin sheets sag. Print or draw a star template, cut the pieces with a sharp craft knife, and fold along the lines using a ruler for crisp edges. Join the points with small dots of glue or double-sided tape. Add a battery-powered LED bulb inside, because real bulbs heat the paper. Hang each star with clear thread at different heights. Keep them away from candles and heaters. The finished lanterns look airy, modern, and gentle, and they turn an ordinary room into a quiet winter scene.
Chunky Knit Stockings
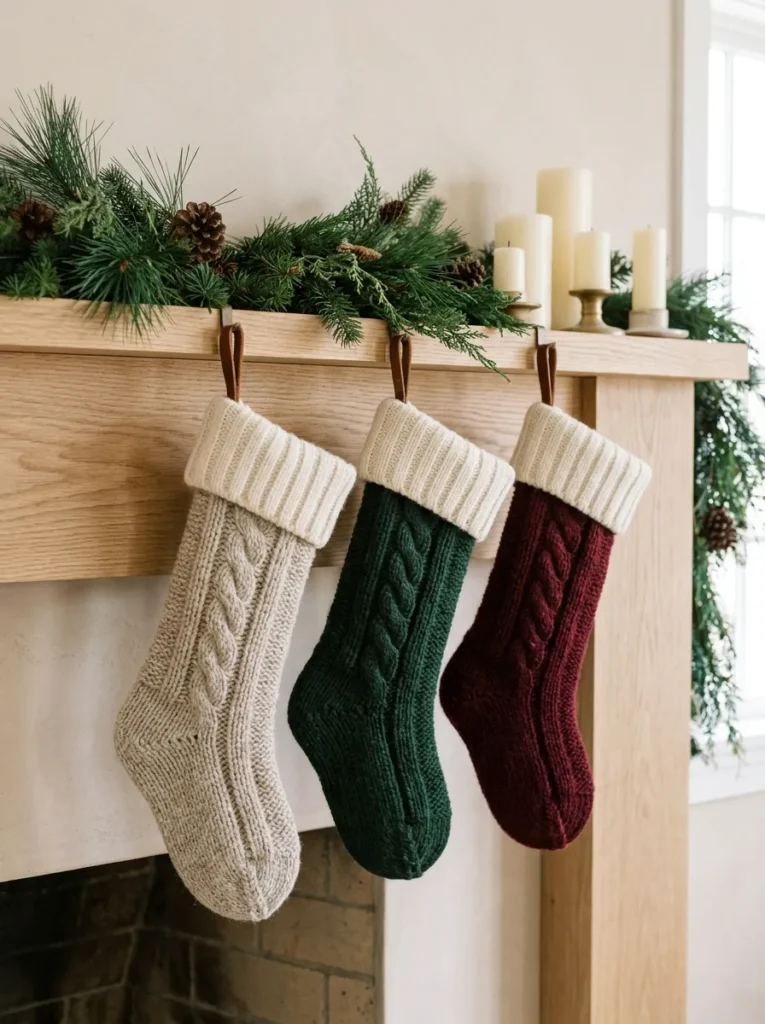
- Adds soft texture to a mantel or stair rail
- Wool felt is a no-knit option for beginners
- Muted colors feel grown-up and calm
- Becomes a keepsake that lasts for years
Soft stockings make a mantel feel lived in. Knit or sew a stocking from chunky wool, add a cuff in a contrasting cream, and hang it from a leather loop. I’ve seen handmade stockings become family traditions, kept for decades. If knitting feels like too much, cut a stocking shape from wool felt and stitch the edges with thick thread. Choose oatmeal, forest green, and burgundy for a grown-up palette. Add a name tag in simple lettering. Set them along a mantel or a stair rail, and the whole room feels warmer and more welcoming.
Good size and sturdy hooks help. Aim for a stocking about forty-five centimeters tall, wide enough to hold small gifts. Use a paper template first, trace it twice onto wool felt, and stitch with a blanket stitch for a neat edge. Add a leather strap or ribbon loop inside the back edge for hanging. Choose strong mantel hooks, because filled stockings weigh more than they look. Wool blends look richer than thin craft felt. Add a sprig of greenery in the cuff for texture. The finished stockings look cozy, classic, and warm, and they make a lovely backdrop for photos.
Evergreen Table Runner

- Pulls a whole dining table together
- Uses clippings from your own yard
- Loose, uneven layout looks more expensive
- Lifts away easily after dinner
A runner can pull a whole table together. Lay a long strip of linen down the center, then arrange cedar, pine, and eucalyptus sprigs in a loose line. I’ve noticed that an uneven, natural layout looks more expensive than a perfectly symmetrical one. Add pinecones, dried orange slices, and a few tall candles along the length. The mix of green, cream, and warm wood feels calm and generous. It suits a dinner for two or a full holiday meal. The materials cost very little, especially if you gather clippings from your own yard.
Freshness and structure matter. Cut greenery the day before, soak the stems in water overnight, and keep the arrangement in a cool spot until dinner. Use a long strip of burlap or linen so the greens do not touch the wood. Keep the center low, below eye level, so guests can talk across the table. Use flameless candles if the greenery is dry. Tuck a few small ornaments or berries between the sprigs for sparkle. After the meal, lift the whole runner away. The finished table looks fresh, fragrant, and elegant, and it makes every gathering feel special.
Bottle Brush Trees

- Builds a tiny winter village on one tray
- Painted tips give an instant snowy finish
- Mixed heights create a layered display
- Costs only a few dollars for the whole set
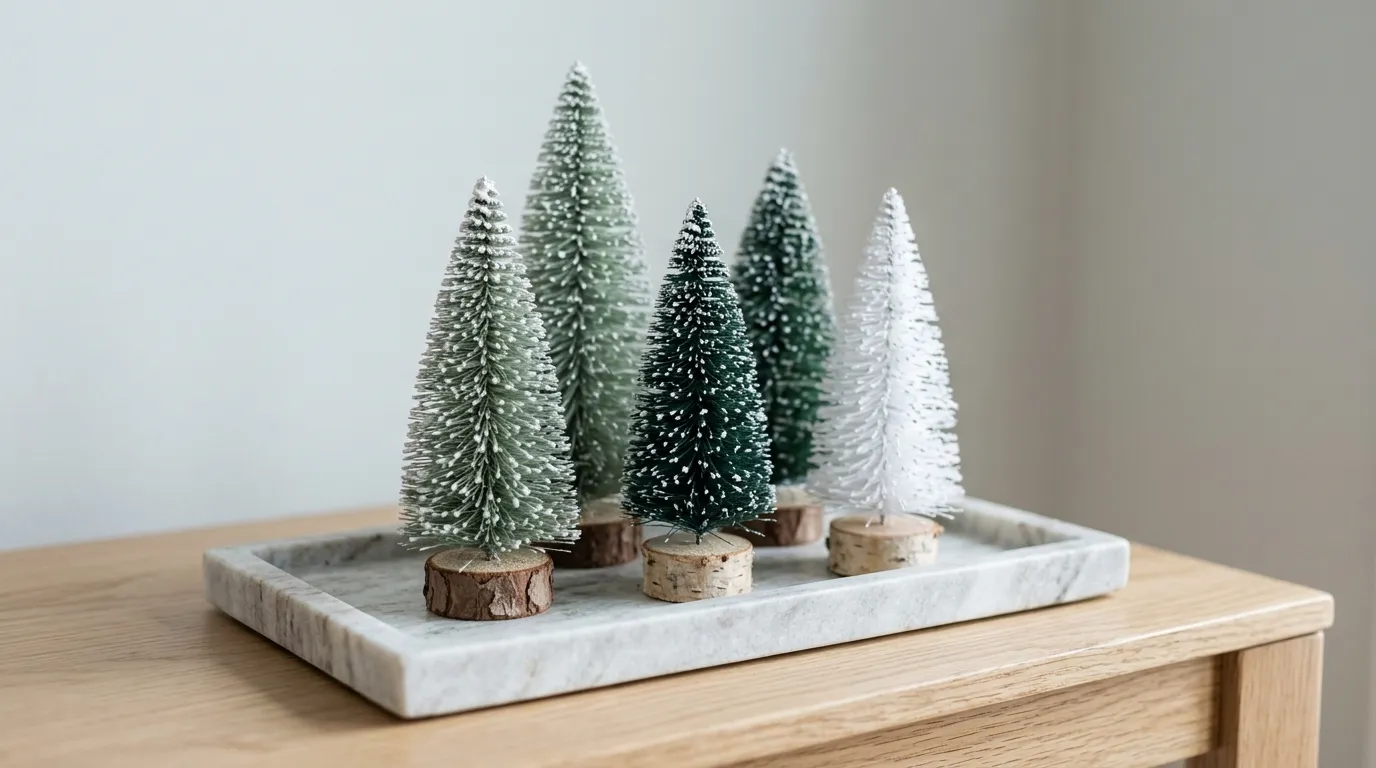
Tiny trees can create a whole winter village. Buy small bottle brush trees in green, white, or sage, and group them on a tray or mantel. Paint the tips with diluted white paint for a snowy finish. I’ve tried this with cheap trees, and the paint made them look like designer pieces. Stand them in small wooden bases or in a bowl of faux snow. Odd-numbered groups look natural. The set costs only a few dollars, and the soft, mixed heights bring a calm, storybook feeling to a shelf or table.
A light touch keeps them elegant. Dip a dry brush in white acrylic, wipe most of it off, and tap it along the branch tips. Let the trees dry fully before moving them. Mount each tree on a slice of birch wood with a dab of glue, so it stands steady. Mix three heights, from eight to twenty centimeters, for a layered look. Add a tiny string of warm lights behind them for a gentle glow. Avoid open candles nearby, since the bristles burn quickly. The finished village looks quiet, charming, and refined, and it fits perfectly on a console.
Painted Glass Baubles
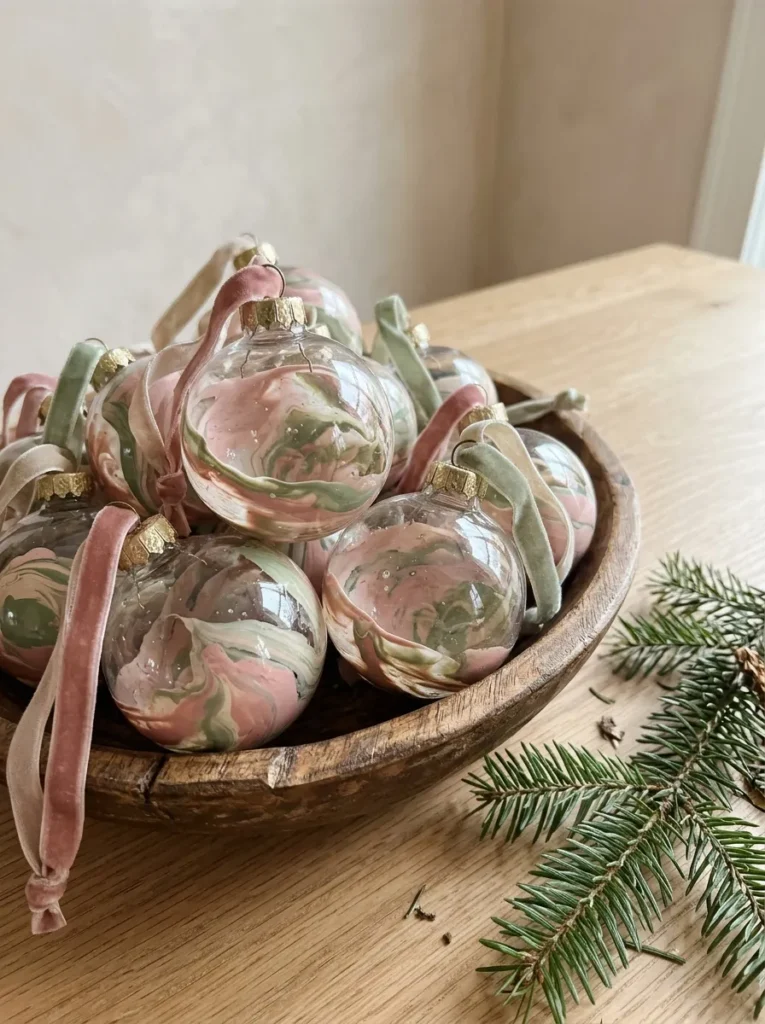
- Turns clear baubles into marbled, jewel-like pieces
- Needs only acrylic paint and a steady swirl
- Looks stunning in a bowl or on a branch
- Costs very little for a full set
Clear glass baubles are blank canvases. Squeeze a little acrylic paint inside, swirl it around, and let the color coat the glass. I’ve seen marbled blush and sage baubles look like hand-blown art. Pour out the extra paint, then let the bauble dry upside down on a cup. Add a gold cap and a ribbon loop for hanging. Choose two colors at most. Fill a wooden bowl with them for a centerpiece, or hang them from a branch. The look is soft, shiny, and modern, and a pack of clear baubles costs very little.
Thin paint flows best. Mix acrylic with a splash of floor polish or water so it spreads smoothly inside the glass. Pour in a small amount, tilt slowly, and rotate until every spot is covered. Use a second color for a marbled effect, but stop swirling early so the colors stay distinct. Let the baubles dry for a full day. Handle them carefully, since glass is fragile and can break. Keep them away from young children and pets. The finished ornaments look polished, jewel-like, and calm, and they bring a boutique touch to any display.
Clove Pomander Balls
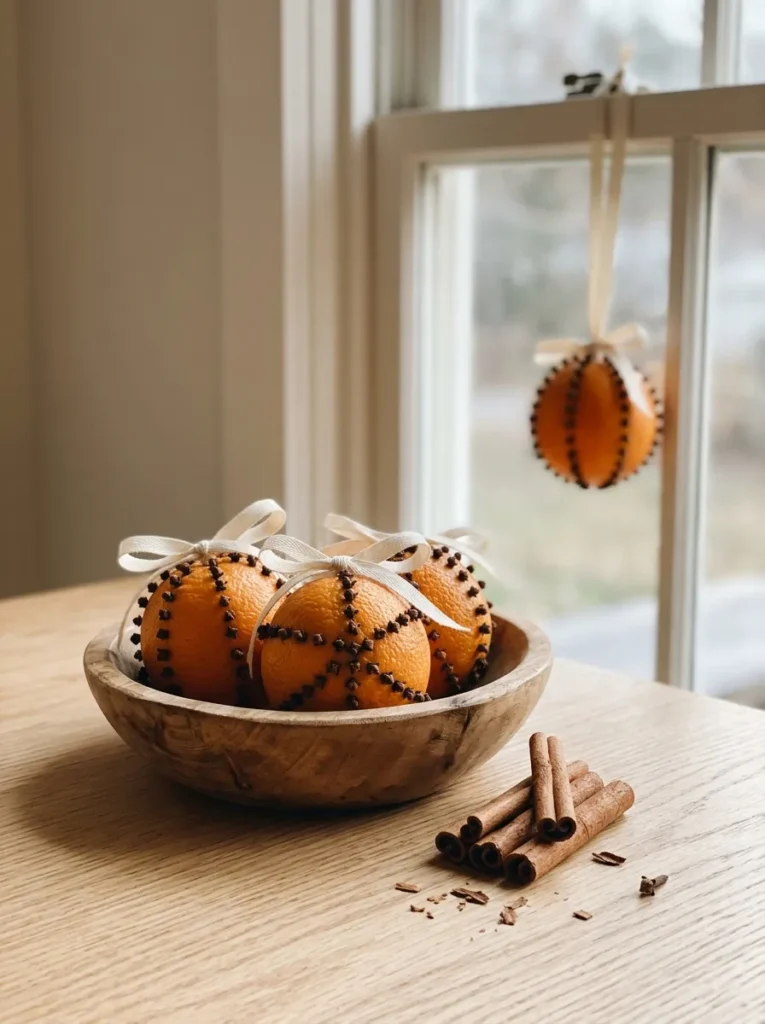
- Fills a room with warm spice and citrus scent
- Needs only fruit, cloves, and ribbon
- Looks old-world and elegant in a bowl
- Dries into a keepsake that lasts for months
Few crafts smell this good. Press whole cloves into an orange in neat rows, and you have a fragrant pomander that looks old-world and elegant. I’ve noticed that the scent fills a small room within hours. Tie a ribbon around the fruit, and hang it in a window or place a few in a wooden bowl. Mix oranges and clementines for color variety. The warm spice aroma suits entryways and kitchens especially well. It costs only a handful of fruit and a jar of cloves, so it is an easy project for beginners.
Patience gives the best pattern. Mark lines on the peel with a toothpick, then push cloves along the lines, spaced close together. Use a thimble to protect your fingertip if the peel feels firm. Roll the finished fruit in cinnamon and let it dry in a cool, airy spot for a few weeks, turning it occasionally. The fruit shrinks and hardens as it dries, keeping the scent for months. Keep pomanders away from pets, since cloves can irritate animals. The finished balls look rustic, aromatic, and timeless, and they make a thoughtful, low-cost gift.
Linen Gift Sacks
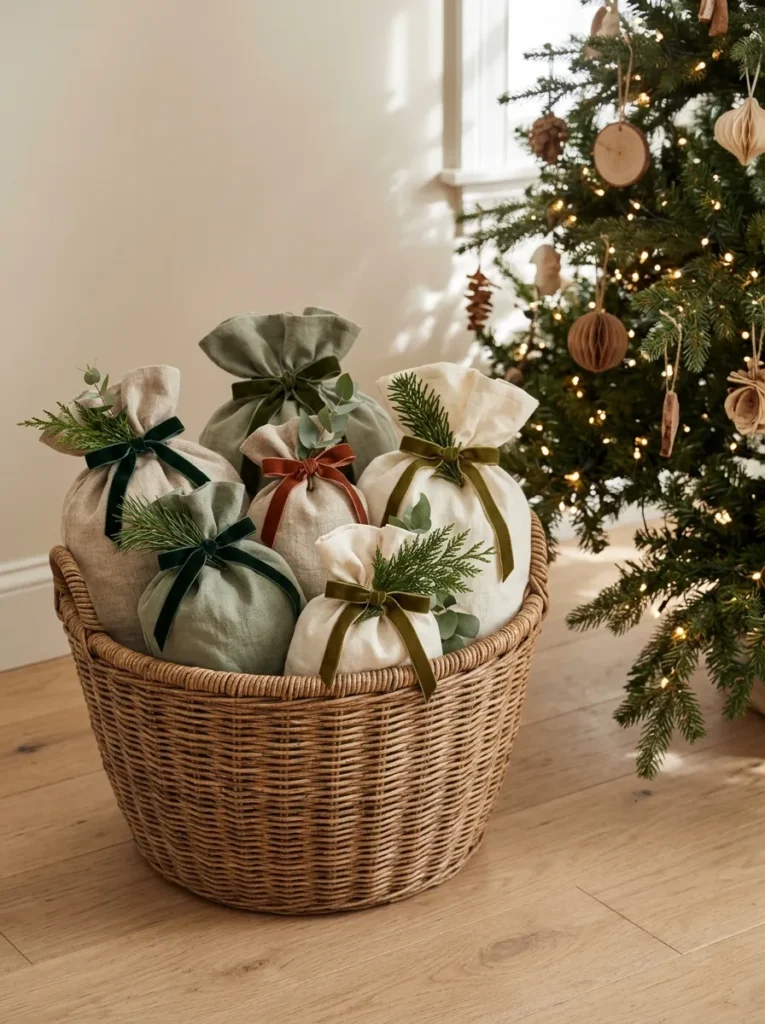
- Replaces wrapping paper with reusable fabric
- Doubles as part of the tree decor
- Quick to sew with straight seams
- Lasts for many holidays
Wrapping can be decor too. Sew simple drawstring sacks from natural linen, and they become reusable gift bags that look beautiful under the tree. I’ve noticed that fabric wrapping gets more compliments than any paper. Choose oatmeal, sage, and cream linen, and tie each sack with ribbon or twine. Add a sprig of greenery or a handwritten tag. The sacks stack neatly in a basket beside the tree, so the display stays tidy. Making a set of six takes about an hour, and the bags last for many holidays, so the cost spreads out.
Simple construction keeps it quick. Cut rectangles about twenty by thirty centimeters, fold the top edge twice to make a casing, and stitch it down. Sew the side and bottom seams, trim the corners, and turn the bag right side out. Thread ribbon through the casing with a safety pin. Finish raw edges with a zigzag stitch or pinking shears so linen does not fray. Pre-wash the fabric to prevent shrinking. Press each seam for a crisp finish. The completed sacks look soft, natural, and elegant, and they turn every present into part of the decor.
Conclusion
A beautiful holiday home doesn’t need a big budget or advanced skills. It needs a calm palette, natural textures, and a few projects you enjoy making. Whether you wrap a velvet wreath, dry citrus slices, or stitch a tiny hoop ornament, these Christmas crafts for adults prove that handmade decor can feel elegant and personal. I’ve seen how small changes like these can completely shift the way a space feels. Save this post on Pinterest, try one idea this weekend, and share it with a friend who loves a cozy, stylish Christmas. Your warmest holiday corner starts with one project.