17 Fall Mason Jar Crafts for Cozy Autumn Home Decor
Fall mason jar crafts turn a plain canning jar into autumn decor with little more than paint, pantry staples, and an evening. These 17 ideas share one rule: give each jar a single added layer (a glow, a finish, or a filler) and let the glass do the rest. Lit from inside, a jar throws a low amber glow across a mantel.
Wrapped in ribbed knit, it feels warm in your hand before anything goes into it. Packed with lentils, cinnamon sticks, or rust-colored leaves, it looks and smells like the first cold evening of the year. Cozy autumn home decor, it turns out, fits comfortably inside a pint.
Jump To
- Why Fall Mason Jar Crafts Make Such a Difference
- The Ideas, Quick Wins First
- Layered Pantry-Staple Jars
- Sweater-Cuff Jar Cozies
- Milk-Glass Interior Paint
- Fairy-Light Leaf Jars
- Three-Height Mantel Cluster
- Pressed-Leaf Découpage Jars
- Dried Wheat Bouquet Jar
- Cinnamon-Stick Luminaries
- Pump-Lid Soap Dispenser Jars
- Torn Tissue-Paper Glow Jars
- Moss and Mini-Pumpkin Cloche
- Floating Cranberry Jars
- Thankful Jar
- Jar Place Settings
- Simmer-Pot Gift Jars
- Wall-Mounted Jar Rail
- Wire-Handle Porch Lanterns
- How to Start Your Fall Jar Decor Transformation
- Frequently Asked Questions
- Ready to Create Your Cozy Autumn Home Decor?
Why Fall Mason Jar Crafts Make Such a Difference
Mason jars are cheap, clear, and uniform, so paint, light, or filler behaves the same way every time. Autumn colors suit them: rust, amber, cream, and deep green all read well through glass because light passes through them.
Small spaces gain the most, since a pint jar takes up about the footprint of a coaster. Start with the crafts that need no tools, then move to the ones that need a wall.
Quick Reference
| Factor | Answer |
|---|---|
| Best starting point | A layered pantry-staple jar (idea 1) |
| Biggest impact area | Mantel, entry table, or windowsill |
| Budget to start | About $10–$25 for three jars (approximate) |
| Time to complete | Under an hour per jar, plus overnight drying for paint or glue |
The Ideas, Quick Wins First
1. Layered Pantry-Staple Jars

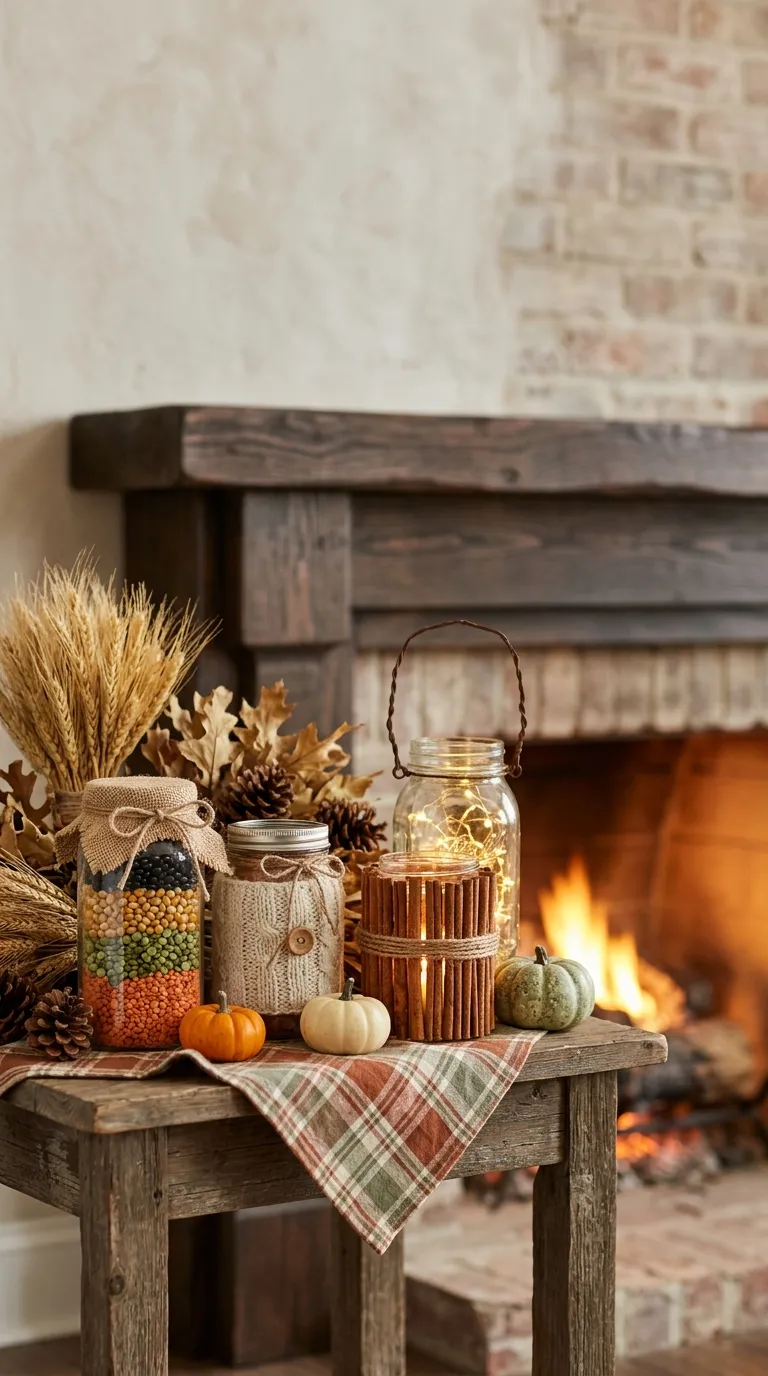
Stripes of red lentils, green split peas, popcorn kernels, and black beans stack up like a core sample of harvest season. Pour the coarsest, heaviest grain first and the finest last, because small grains sift into the gaps between large ones and blur the line. Neighboring layers should differ in size as well as color.
Tap the jar on a folded towel after each pour, and aim for layers about an inch thick; a quart jar holds five or six. Anyone with a cupboard and twenty minutes can start here, and it pairs well with other budget home decor crafts.
Quick Win: Pour through a cone of rolled printer paper. Stray grains on the glass are what muddy the stripes, and the cone keeps the walls clean.
2. Sweater-Cuff Jar Cozies
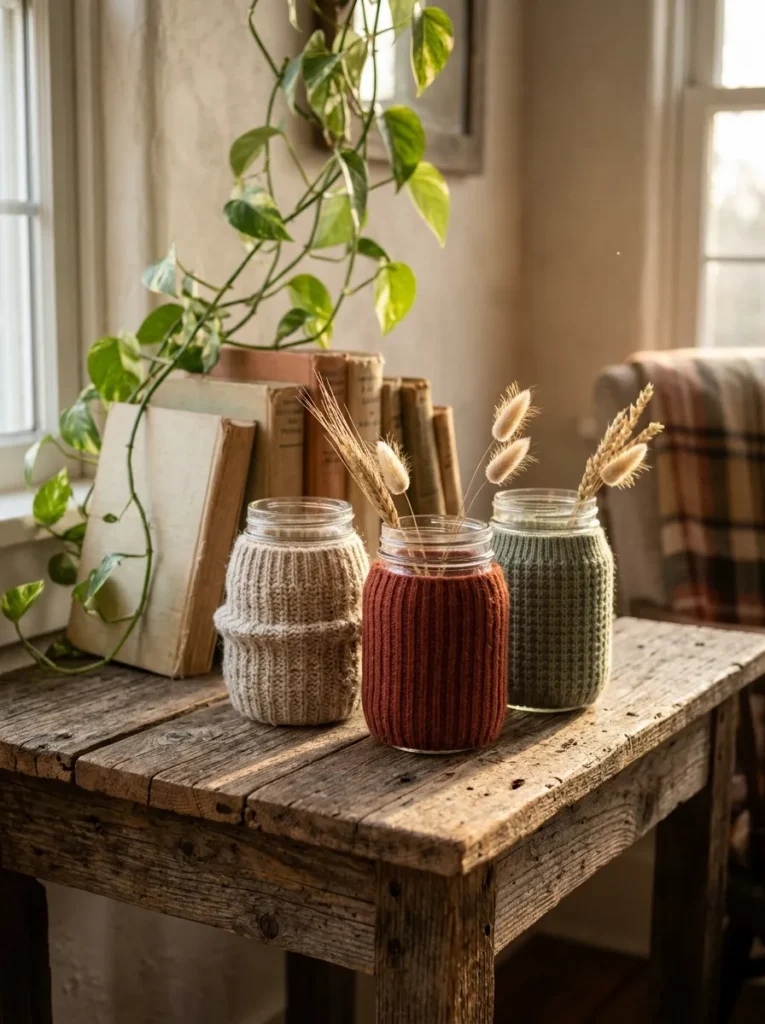
Anyone with a retired sweater and a pair of scissors can dress a jar in about five minutes. Ribbed cuffs stretch, so a cuff cut from the sleeve hugs a pint jar with no sewing; chunky cable knit works too but bunches at the shoulder.
Measure the straight section of the jar below the neck threads and cut to that height, so the knit can’t ride up over the lid. Oatmeal against clear glass, or rust over a flameless tea light, gives the glass a texture to push against.
Pro Tip: If the label says 100% wool, wash the sweater hot and tumble dry it before cutting. The fibers felt, and the cut edge stops fraying, so there’s nothing to hem.
3. Milk-Glass Interior Paint
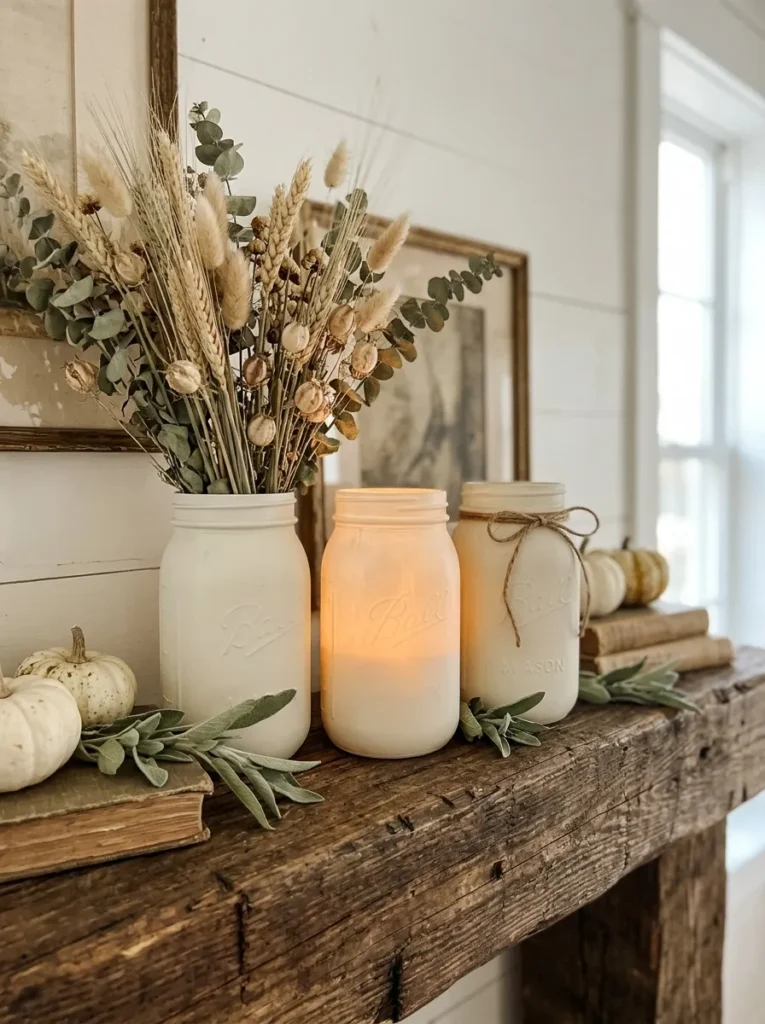
Squeeze a spoonful or two of cream acrylic paint into a clean jar, tilt and roll until the glass is coated, then tip the jar upside down on parchment paper to drain. Painting the inside leaves the outside smooth and wipeable, and the glass gives the paint a soft milk-glass look.
Two thin coats dry opaque without drips; one thick coat runs. Cream, sage, and terracotta read as autumn, while stark white leans spring. Keep these for dry decor, since water and washing wear the paint away.
Styling Note: Run a clean thumb around the rim before the paint dries. Beads of paint on the threads keep the lid from seating flush.
Idea 4 overturns the assumption that jar lights need an outlet: a battery string and a few faux leaves make a bookshelf lamp.
4. Fairy-Light Leaf Jars
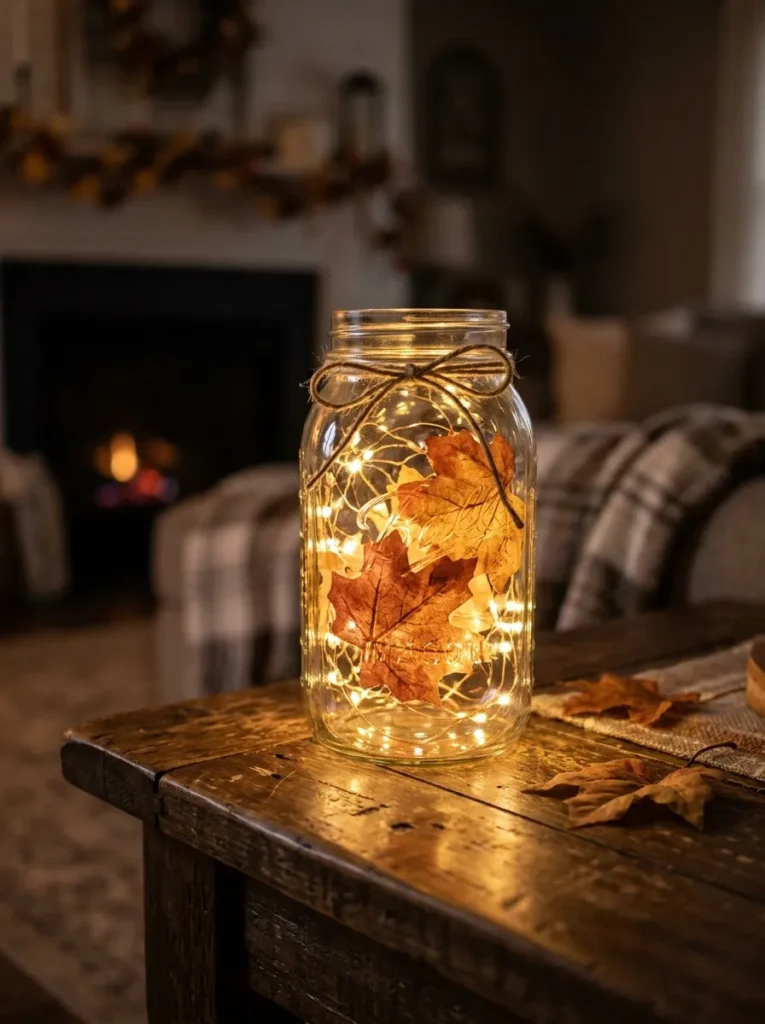
A string of lights stuffed into a bare jar leaves a hard knot of bulbs, glaring and a little sad. Press three or four faux leaves against the glass first, then feed the string down the center so the leaves soften every bulb. Choose a battery string with warm-white bulbs on thin copper wire, which almost vanishes behind foliage, and keep the battery pack outside the jar behind the base.
Stay with battery power near paper or fabric; if you try a plug-in string instead, leave the lid off and confirm its packaging says indoor use. Bookshelves and nightstands without an outlet are the natural home.
Important: Fairy lights aren’t all rated for the same places. Battery strings sold for indoor decor should stay indoors; outdoor use needs a set whose packaging says so.
Get the Look
| Product | What to look for |
|---|---|
| Battery-operated micro LED string | Warm-white bulbs, thin copper wire, a pack small enough to hide behind the jar |
| Faux maple or oak leaf stems | Matte finish, muted rust and gold, wired stems that bend to the glass |
| Faux berry picks | Small clusters in deep red or burgundy, flexible stems that tuck beside the jar |
5. Three-Height Mantel Cluster
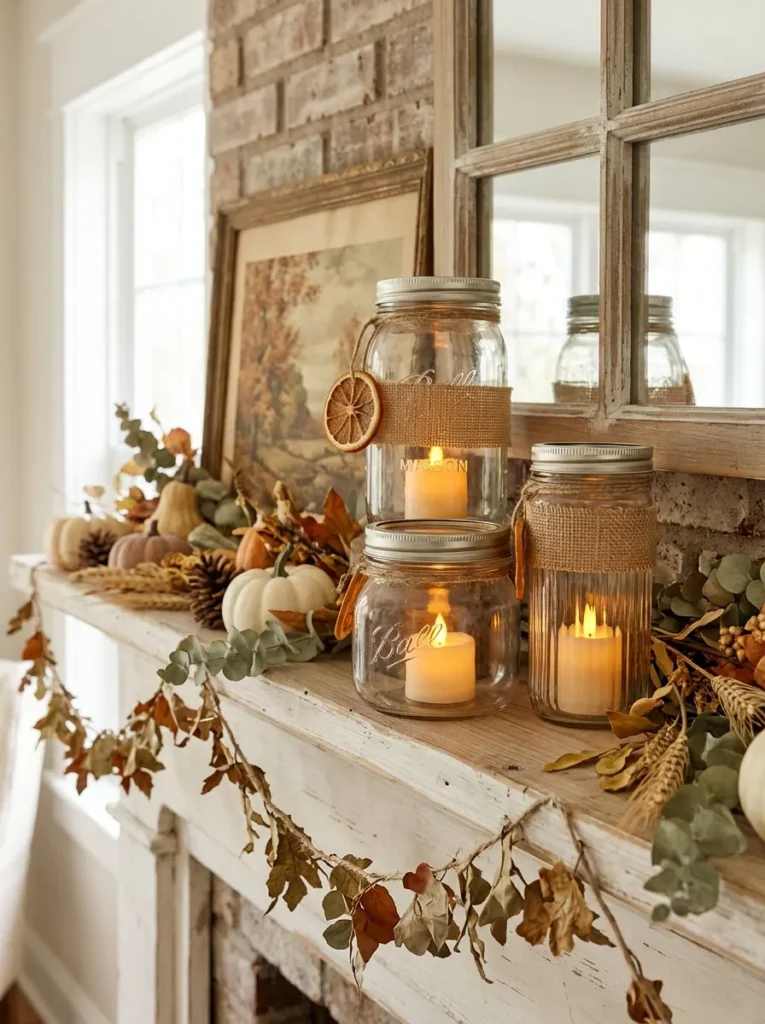
Three jars at one height read as storage; three at different heights read as an arrangement. Set a half-gallon, a quart, and a pint in a loose triangle, tallest at the back, rather than lined up like soldiers. Keep one finish across the group (all milk-glass, or all clear with the same filler) and let height be the only variable.
Leave a hand’s width of bare mantel on each side so the cluster has room to be seen. Mantels, console tables, and any ledge that looks unfinished will take it well, like most fall decor DIY projects.
Small-Space Tip: On a narrow sill, skip the triangle. Stagger the jars front to back by a couple of inches and set the pint on a thin book or wood coaster as a riser.
6. Pressed-Leaf Découpage Jars

Maple, oak, and ginkgo leaves, pressed flat and sealed under glue, look like botanical prints on glass instead of craft-fair stickers. Dry the leaves between book pages under a stack of books for a week or more; a leaf that is still damp can brown under the medium.
Thin leaves such as ginkgo glow when a flameless light sits behind them, while thick oak stays opaque and graphic. Wipe the finished jar with a barely damp cloth and skip soaking. Anyone with a maple in the yard and a little patience will find the pressing is the only wait, which makes it a good fit among easy fall crafts for adults.
✅ Découpage Steps:
- [ ] Press the leaves between book pages for a week or more
- [ ] Wipe the jar with rubbing alcohol and let it dry
- [ ] Brush decoupage medium on the glass and lay each leaf from the center out
- [ ] Smooth gently toward the edges with a soft brush
- [ ] Seal with a thin top coat and let it dry fully
Idea 7 hinges on a ratio: stems cut too long or too short are the difference between a styled jar and a bundle of straw.
7. Dried Wheat Bouquet Jar
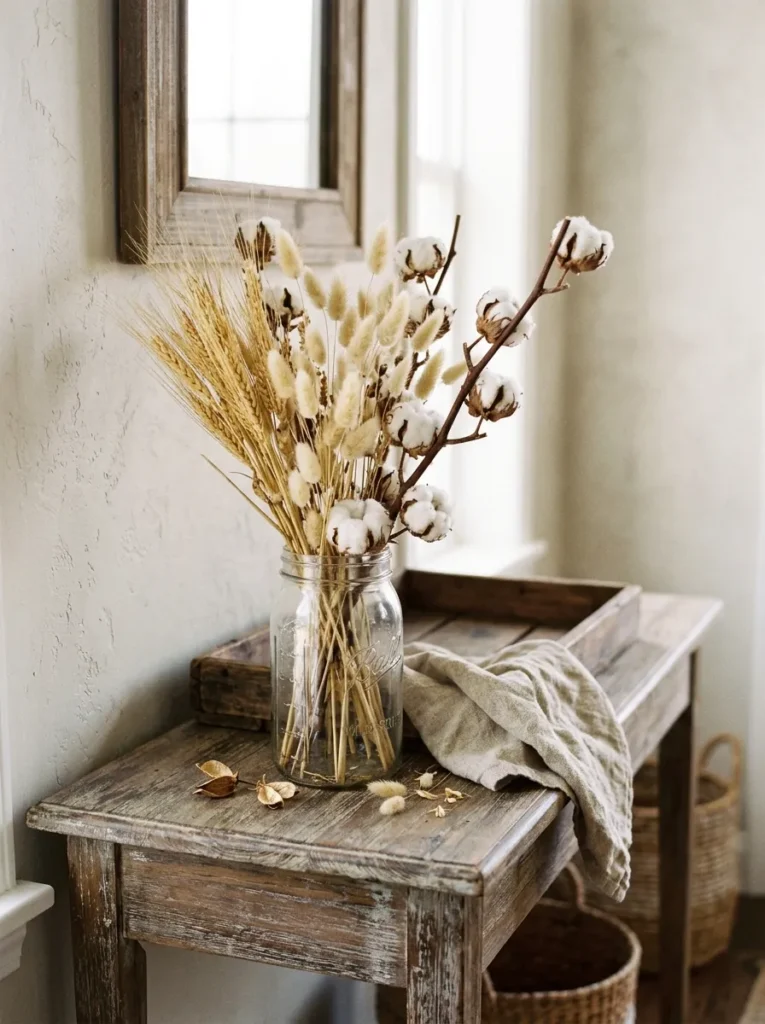
Cut wheat stems to about one and a half times the jar’s height, measured from the tabletop, and the bouquet sits in proportion instead of tipping top-heavy. Vary stem lengths by a few inches within the bundle; a flat-topped bunch looks like a broom.
Pour dry rice or lentils into the bottom so tall stems don’t tip the jar, and strip any leaves that would sit below the rim. A quart jar suits a loose handful, a half-gallon a full armful. Dried stems are the low-maintenance autumn arrangement: no water, no wilt.
Pro Tip: Keep dried arrangements away from heating vents and sunny windows. Heat and sun both make wheat brittle and fade the gold toward gray.
Get the Look
| Product | What to look for |
|---|---|
| Dried wheat bundle | Long stems with intact heads, long enough to reach one and a half times your jar’s height |
| Dried bunny tail grass | Soft, fluffy heads that contrast with wheat’s spikes, not shedding |
| Dried cotton stems | Open bolls on woody stems, sturdy enough to stand without support |
8. Cinnamon-Stick Luminaries
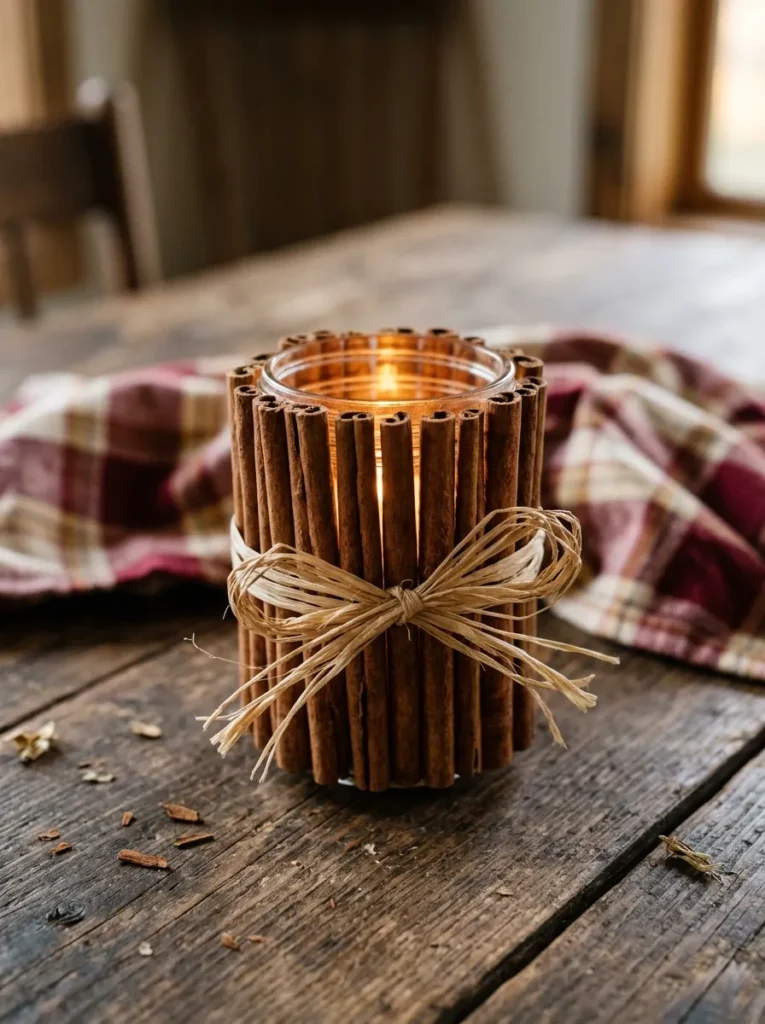
Hot-glue cinnamon sticks upright around a jar and it looks like a tiny cabin wall; a flameless light inside warms the glow to amber. Choose sticks of similar thickness, since mixing thick and thin leaves gaps that expose the glue, and set them edge to edge.
Hide uneven tops under a band of raffia tied around the middle. The sticks carry a faint cinnamon smell on their own. A kitchen windowsill or side table is the right stage. Skip glitter and ribbon on top; the sticks are doing enough.
Warning: Dry cinnamon bark, hot glue, and raffia all burn. Use only a flameless light inside, and keep the finished jar away from the stove and any open flame.
9. Pump-Lid Soap Dispenser Jars
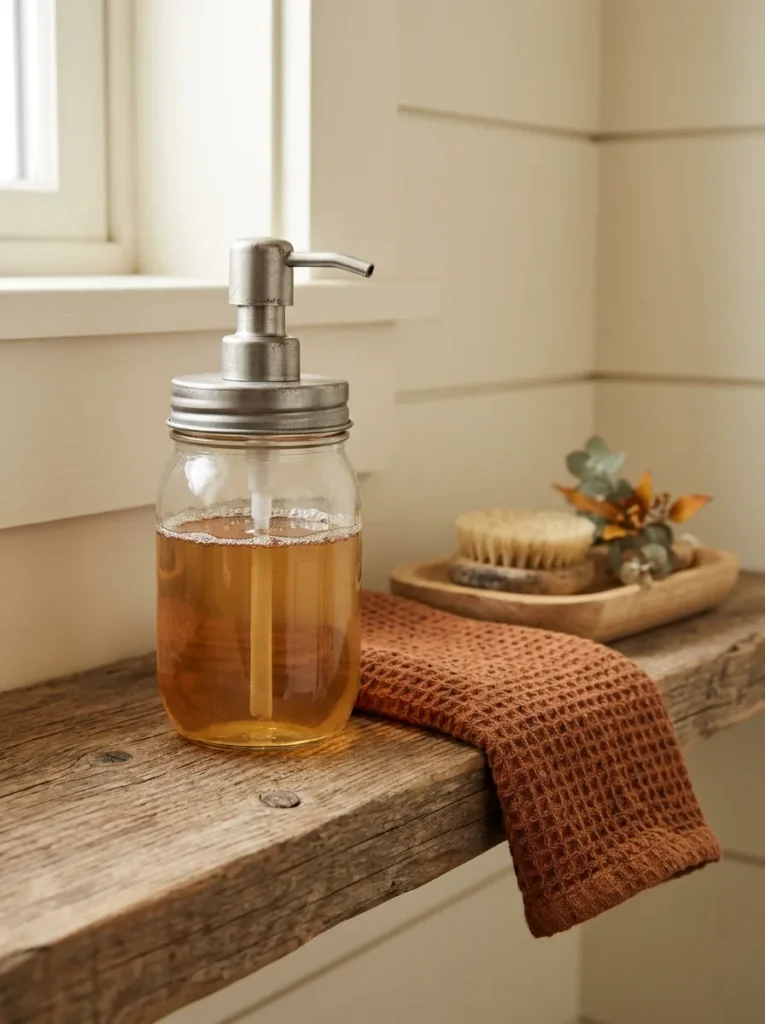
Anyone who wants autumn in the bathroom without buying seasonal decor can start with the soap dispenser. A quart jar with a pump lid replaces a plastic bottle and looks intentional beside the sink. Match the lid to the jar mouth first: regular-mouth and wide-mouth jars take different lids, and the pump will not thread onto the wrong one.
Trim the dip tube so it reaches the bottom without bending. Because the jar sits beside a wet sink, choose a stainless or plastic pump, since ordinary steel rusts and stains, and dry the ring after refills.
Mistake to Avoid: Many pump lids are made for liquid soap or lotion, and a foaming soap needs a foaming pump. Check the listing before you buy.
Idea 10 asks you to tear paper rather than cut it, and the torn edge is what makes the glow look layered.
10. Torn Tissue-Paper Glow Jars
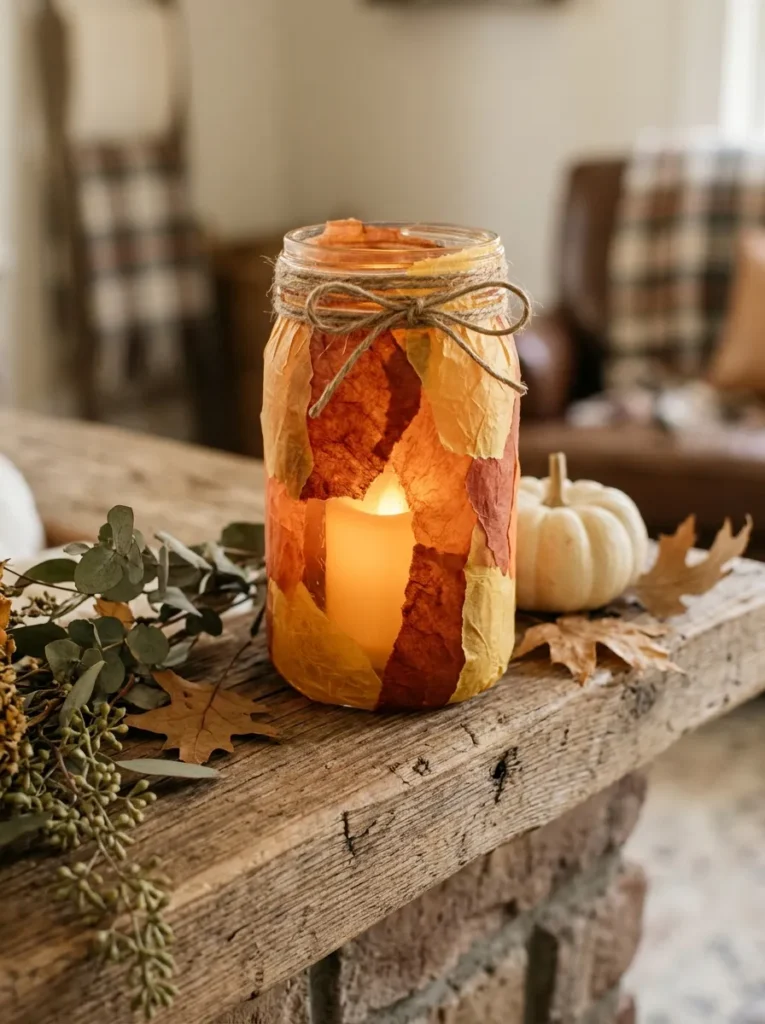
Light passing through tissue takes on the paper’s color, so orange, rust, and butter-yellow scraps give a jar a harvest-lantern glow when a flameless tea light sits inside. Tear the paper instead of cutting it, as in many fall paper crafts; torn edges feather and overlap without hard lines.
Brush decoupage medium on the glass, press scraps on with slight overlap, and brush another thin coat over the top. Two or three colors read as turning leaves; five or six read as confetti. Use flameless lights only, since tissue burns. An entry table, where a low light helps at night, is a good spot.
Important: Tissue labeled non-bleeding keeps its colors crisp. Bleeding tissue streaks into neighboring scraps when wet, which suits a watercolor look but surprises anyone expecting clean shapes.
11. Moss and Mini-Pumpkin Cloche
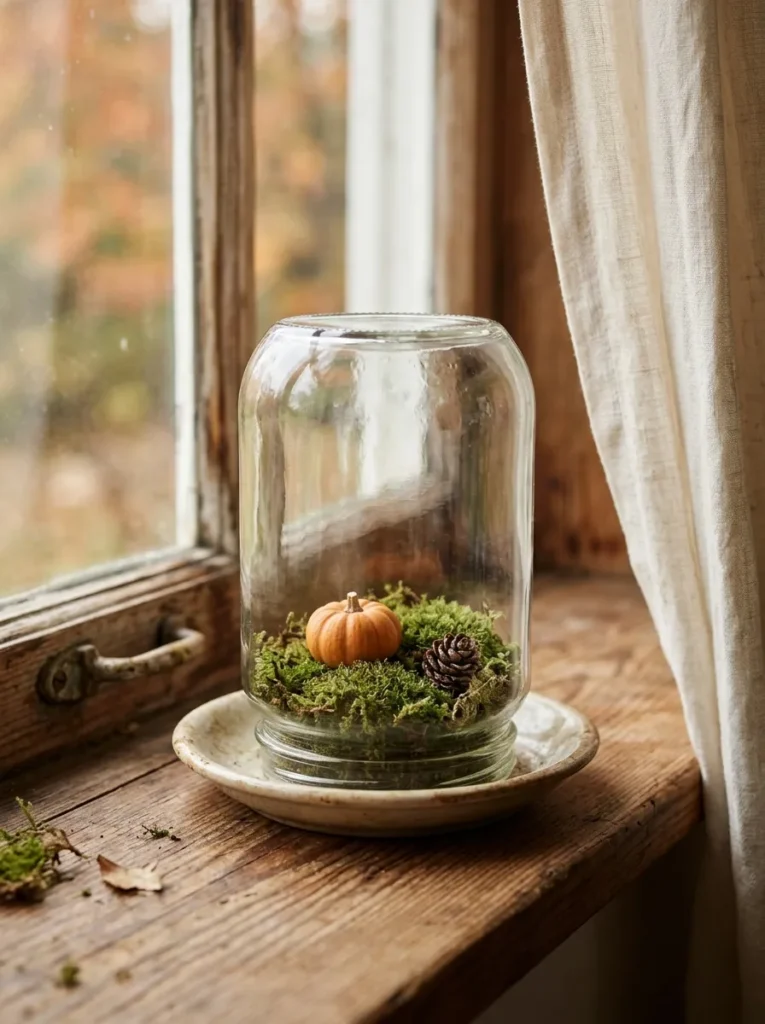
Turn a jar upside down over a small saucer and the cloche frames a tiny woodland scene: a cushion of moss, a white mini pumpkin, two acorns. Use preserved moss, which needs no water or light, rather than live moss, which would struggle under glass without care.
Leave a third of the saucer empty so the scene has air around it; crowding the plate is the usual failure. A real pumpkin will eventually soften, while a faux one lasts all season. Desks, nightstands, and windowsills too small for a bouquet are where this fits.
12. Floating Cranberry Jars
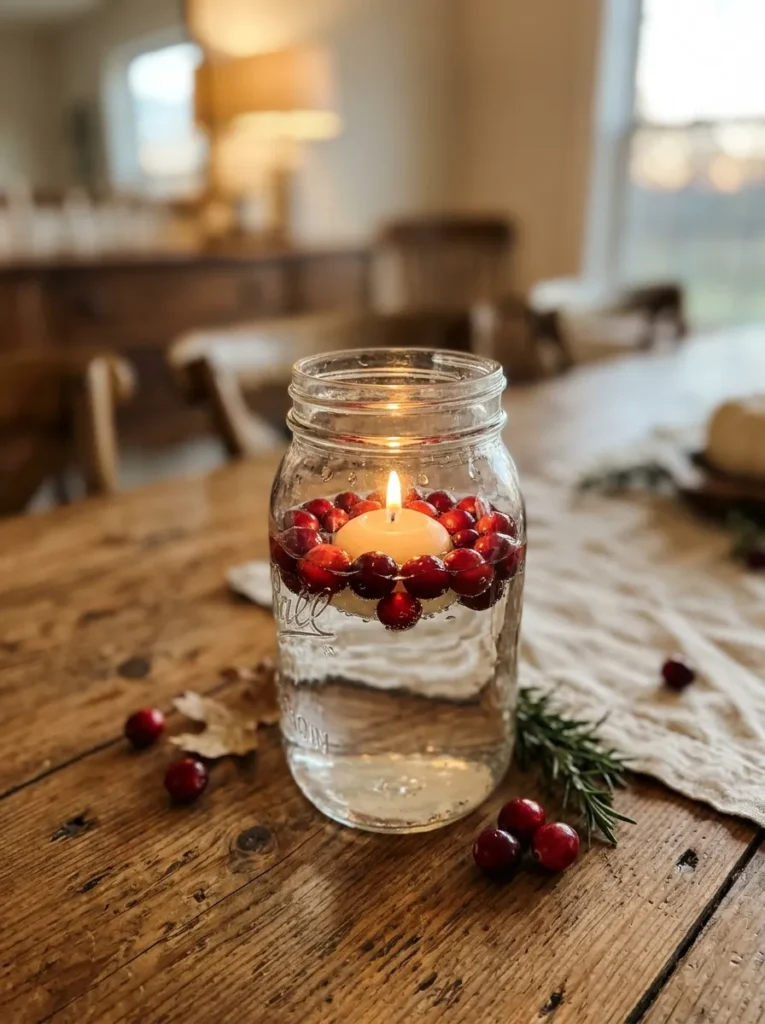
Fill a quart jar about two-thirds with water, tip in fresh cranberries, and set a floating or submersible LED in the center. Cranberries float, so they gather into a red ring around the light. Rinse the berries first, discard any soft or split ones, and change the water when it clouds. Use only LEDs labeled waterproof or submersible, and never run a plug-in string near water. A dining table or deep windowsill shows the glow best after dark.
Pro Tip: Keep the layer of berries one to two berries deep. A packed surface blocks the light and turns the jar into a solid red lid.
Idea 13 needs only a paper bag and a pen, yet it’s the one jar your guests will actually touch.
13. Thankful Jar
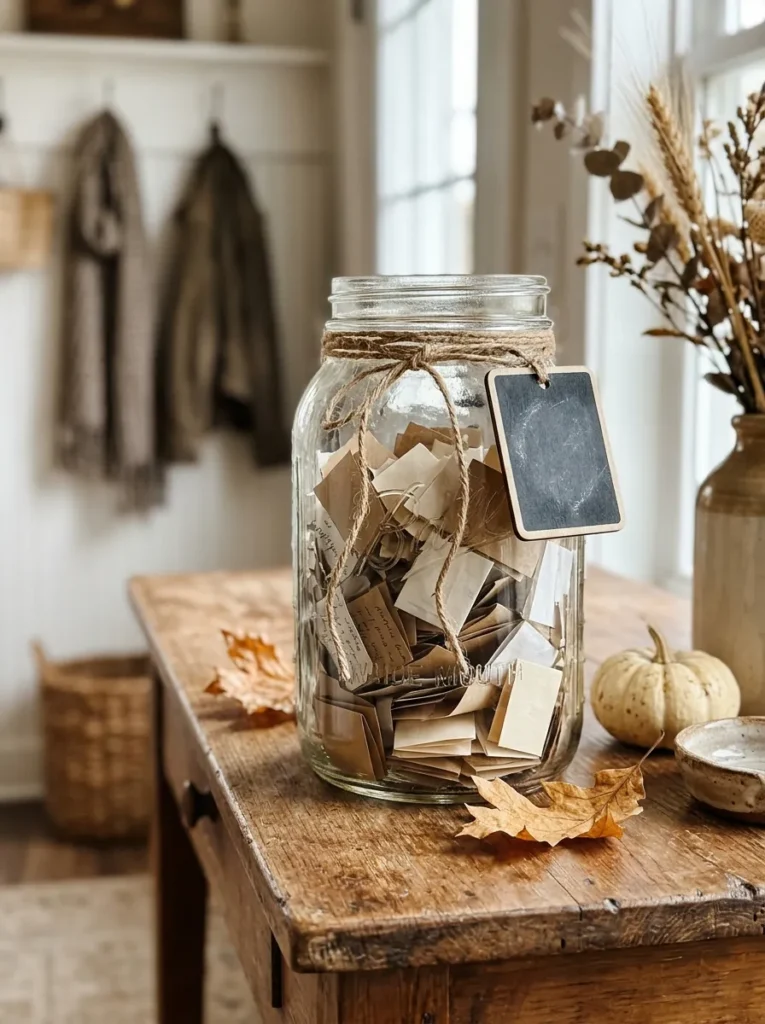
Households with kids, and hosts who want decor guests can touch, get the most from a thankful jar. Cut leaf shapes from kraft paper or grocery-bag scraps, keep a pen beside a wide-mouth quart jar, and let each guest write one thing they are thankful for.
Cut each leaf narrower than the jar’s mouth so notes drop in without creasing; folding the paper first gets several leaves per cut. By Thanksgiving the notes curl against one another like fallen leaves, and reading them aloud is the centerpiece.
Budget Version: One jar from the cupboard, a paper grocery bag, and a pen are the whole kit, so the project costs nothing if you already own all three.
14. Jar Place Settings
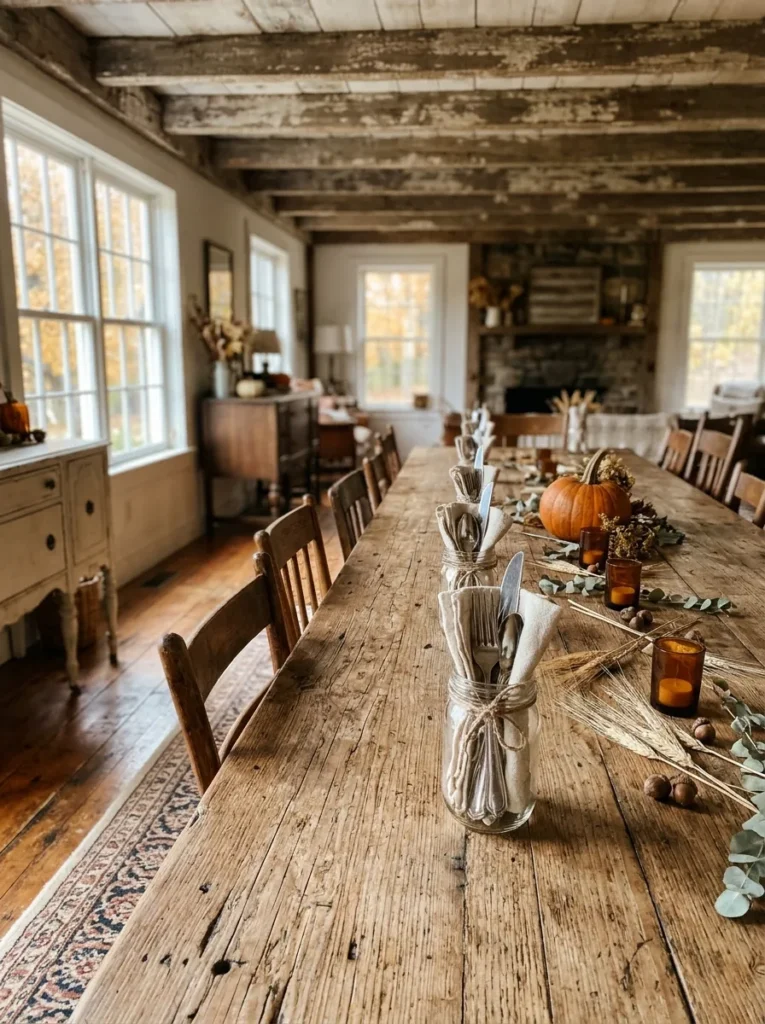
Repetition is the rule here: a row of identical pint jars at even intervals makes a buffet or long table look planned. Pour dry rice or lentils into the bottom so the silverware stands upright and doesn’t clatter, tuck a folded napkin behind it, and loop a name tag on twine around the neck. Line the jars up at the head of the buffet so guests take one and go. Potlucks and Thanksgiving tables with a crowd are the sweet spot.
Important: A jar loaded with silverware is top-heavy. A wide pint with a weighted base stands more securely than a tall, narrow jar.
15. Simmer-Pot Gift Jars
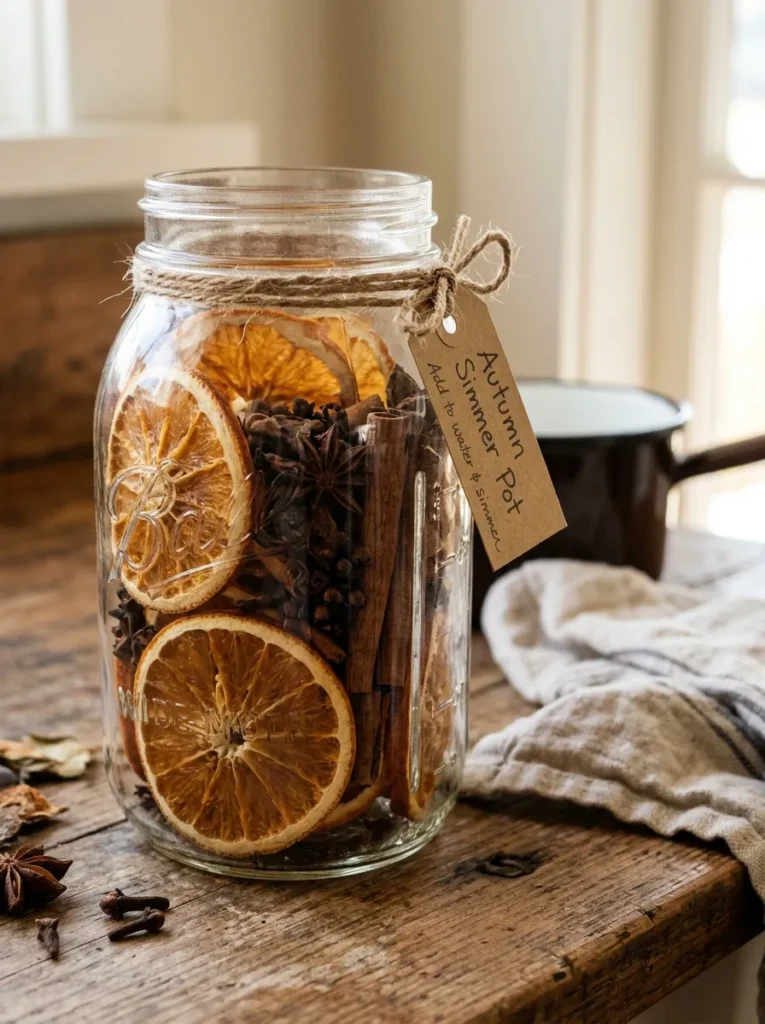
Dried orange slices pressed against the glass look like stained windows, with cinnamon sticks, whole cloves, and star anise filling the center. The recipient tips the jar into a pot of water and simmers it on low, so the kitchen smells like cider.
Dry the orange slices completely before layering; any moisture left in them can turn moldy inside a closed jar. The jar is only the container and never goes on the heat. Add a tag with directions, because few people know how to use a simmer mix. Wide-mouth pints make the neatest handmade gifts.
Warning: A simmering pot boils dry faster than it seems. Keep it on low, top up the water, and never leave it unattended.
MY Observation
The assumption worth testing: that a brighter bulb makes a better jar. Hold a scrap of orange tissue over a warm-white bulb, then a cool-white one. The warm light keeps the orange rich; the cool one drains it toward beige. Orange tissue, amber soap, wheat, and cinnamon all lean warm, so choose warm-white bulbs and accept a lower brightness.
Idea 16 puts jars on the wall, which means weight, not looks, decides the build.
16. Wall-Mounted Jar Rail
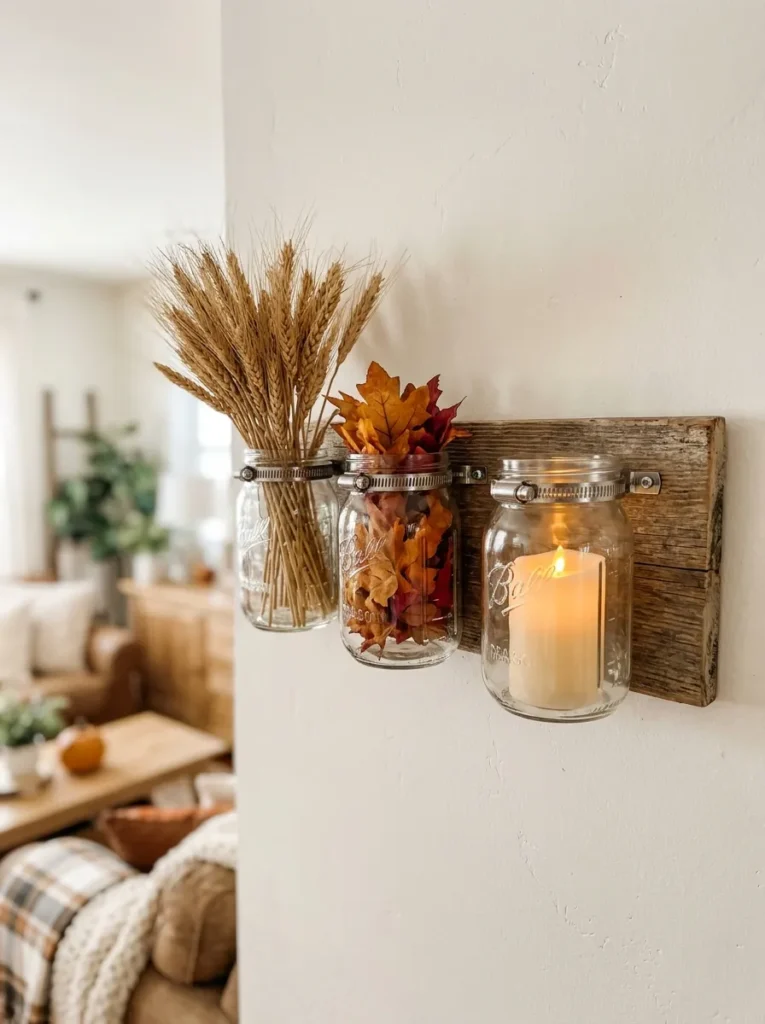
Shelves hold jars; a board with hose clamps lets them hang beside a doorway instead. Tighten stainless hose clamps around each jar’s neck below the threads, screw the clamps to a plank, and leave a gap about one jar’s width between jars so each reads as its own vase.
Fill them with dried stems, never water, since a jar of water weighs far more than a jar of wheat. Anchor the plank into wall studs, or use anchors rated well above the loaded weight; your wall type and your own measurements decide, not the packaging. Renters can lean the plank on a mantel instead, and the same plank suits other handmade wooden gifts.
17. Wire-Handle Porch Lanterns
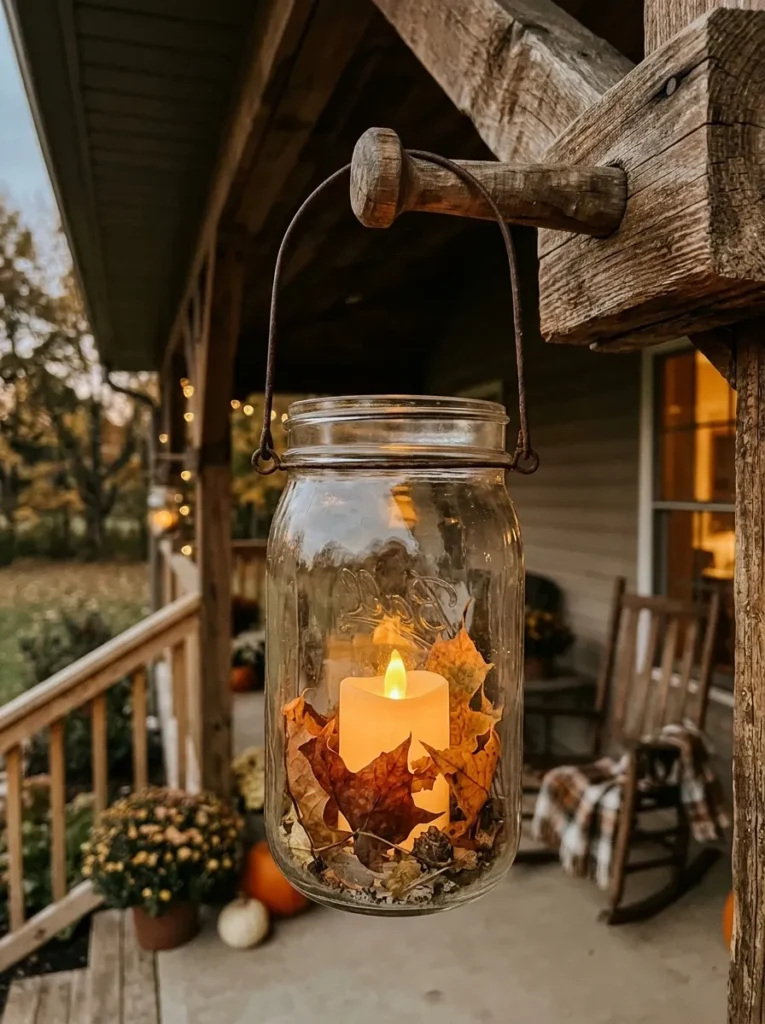
Wrap craft wire twice around the jar’s neck below the threads, twist the ends tight, then bend a second length into an arc handle and hook it to the loops. Drop in an outdoor-rated battery candle and the jar hangs on a porch hook as an amber lantern. Choose sturdy wire and tug-test the handle with the jar in hand before hanging it. Hang jars where they won’t swing into a wall, since glass chips, and use hooks rated for far more than the lantern weighs. Porches and balconies suit this best.
Warning: A closed lid traps condensation, and moisture corrodes battery contacts. Leave the lid off, hang jars under cover, and bring the lights in during heavy rain.
How to Start Your Fall Jar Decor Transformation
Start here: one wide-mouth quart jar, filled with layered lentils, split peas, and popcorn kernels. It costs almost nothing, takes twenty minutes, and teaches the rule every other craft depends on, which is to change one thing about the jar (its filler, finish, or light) and leave the glass otherwise alone.
The most common beginner mistake is stacking layers: paint, twine, a tag, and glitter on a single jar. Each layer competes with the others, and the glass, which is the whole point, disappears under them. Strip back to one added layer and look again.
Three low-cost items cover a good share of the list: a case of wide-mouth quart jars, matte acrylic craft paint in cream, and a pack of flameless tea lights. All three are typically inexpensive, and together they carry several of the ideas above without another shopping trip.
A starter set of three jars takes one evening plus overnight drying for the painted one, and roughly $10–$25 (approximate), assuming you own scissors and a brush. The full seventeen stretches across several weekends and roughly $60–$120 (approximate), depending on how much is already in your cupboard. Pressing leaves for idea 6 takes a week, while ideas 1, 2, and 13 are quick weekend jobs.
Frequently Asked Questions
Can I burn a real candle in a mason jar?
Flameless LED candles are the safer choice, since canning jars are made for canning rather than for holding a flame, and glass can crack with heat or sudden temperature change. If you do use a real tea light, set the jar on a heat-safe surface, keep it away from paper, twine, and spices, and never leave it burning unattended.
What kind of paint works on glass?
Water-based acrylic craft paint adheres well to the inside of a jar that will never be washed or filled with liquid. For painted exteriors, look for paint labeled for glass and follow its cure instructions before cleaning. Skip the dishwasher either way, since heat and detergent lift most craft finishes.
How do I keep fall mason jar crafts from looking cluttered?
Limit each jar to one added layer, whether a light, a finish, or a filler, then repeat a palette of two or three colors across the group. Display jars in odd numbers and leave a little bare surface around them, so the glass still reads as glass.
Can renters make these?
Yes, because every idea except the wall rail is freestanding. For the rail, lean the plank against a mantel or rest it on a shelf instead of anchoring it, and check your lease before putting holes in any wall. Everything else sits on a surface and leaves no mark.
Ready to Create Your Cozy Autumn Home Decor?
Seventeen jars cover light, texture, scent, and table settings without asking for a big budget. The common thread is restraint: let one layer carry each jar and the glass handles the rest. Start with a single jar tonight, a quart of layered lentils set where the evening sun lands.
When the kitchen smells of cinnamon and the shelves glow amber, autumn feels like it moved in on purpose. Save your favorite fall mason jar crafts to a Pinterest board so the first cold snap finds you ready.
Keep Exploring
- 15 Fall Mason Jar Centerpieces for Thanksgiving Tables
- 12 Cozy Fall Mantel Ideas Using Simple Glass and Dried Stems
- 20 Easy Fall Wreath Crafts for Your Front Door